A Little about me

Hi! Welcome to my blog. I have loved doing crafts for as long as I can remember-sewing, ceramics, painting. But I have only been involved in paper crafts for the past four years.What I love the most about paper crafts is the plethora(check out the 50 cent word) of styles and techniques in paper crafting.There is something for everyone. I hope, on this blog, to show you some of the techniqques I have learned and the cards or scrapbook pages I have made using those techniques.

Tuesday, July 24, 2012

2 more svgcuts cards


Two more cards from the Christmas Cheer svgcuts kit.  The first is called Folded Tree as the tree is accordian folded to give it demension.  The top and bottom partof the tree are 2 seperate pieces.  The 2nd card is called Jingle Jave and is perfect for all those coffe loving friends.
So I have 5 down and only 2 more to go in the kit.  Stay tuned for more to come.

Monday, July 23, 2012

I've been on a roll!

This is the third card from the svgcuts Christmas Cheers kit.  The cardstock is from a Martha Stewart pack with the exception of the trumpet.  The flower is from my stash.  Going to make the other cards in the kit.  I am having so much fun making them. 

Another Christmas Cheer card

O here is the other card I said I would make from the Christmas Cheer svgcut kit.  It is the "Department Store" card with a Christmas theme.  Patterened paper is the reverse from the wreath patterened Stampin Up paper, which BTW is retired.  The windows are vellium.  I pulled my embellishment stash out and found some Christmasy goodies to add to the card as well as some peel offs.  Hope

Wreath Card

I just completed this card that I made from svgcuts.com's "Christmas Cheer" kit.  The pointsettias were shaped as any other 3D flower with my McGill shapping tools.  All of the cards elements were cut using my Sizzix Eclips die cut machine.  Patterned paper is from Stampin Up d I used crystal gems in the center of each flower.  As I have lots of free time today, ok, I should be doing in housework or the like, but rather be crafting, I will make another project from the same kit and post later.  Hugs and keep cool.

Tuesday, July 17, 2012

I'm Back


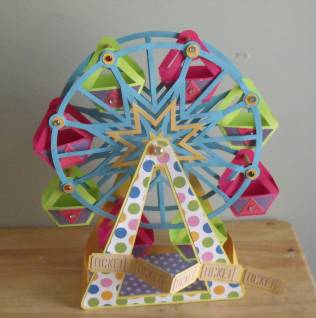
It has been a really long time since I have posted here and it is now time to get  back in the swing and craft and post.  My latest project is the Ferris Wheel from svgcuts, "Summer Street Carnival".  It was a very laborous project,but the finished work was well worth it. I used glittered cardstock for the accens on the cars and wheel and attached crystal "gems" to the wheel spokes to give the effect of carnival lights.

Thursday, May 20, 2010

Tilda Explosion box


I love these little explosion boxes and Tilda adorning them make them extra special. At times when making a card or in this case, the boxes, simplicity is called for. Tingla was colored using CopicsE000,E02 & E21 for face and hands. booties R81 and sleeper R83 & R85. The heart, R29. Hair, Y02 & Y08. Paper is DCWV Summer and the flowers where some I had on hand. The inside of the box is decorated with 3D stickers and a sentiment. Directions on how to make the box can be found on "Splitcoast Stampers." Wouldn't this cute little box make a perfect card and gift box in one to hold a gift card or a monetary gift, or as a table favor at a Baby Shower?

Friday, March 19, 2010

Spring Time Tildas


Here are 2 cards I made colored with Copics. For the Tilda on the wall, I cut around the flowers on the patterned paper and inserted the bottom edge of the wall into the paper to add more dimension to the wall. I love monochromatic with a splash of colors here and there, which is what I did with Tilda with the egg and the egg cart. I used an ultra-fine yellowish glitter on Tilda's wings.

Monday, March 15, 2010

Pretty Tilda


Here are some of my first "Tilda" cards.
Tildas are rubber, unmounted stamps that originated in Sweden.
They and her companion stamp, Edwin, are the latest craze in stamping and card making. These top two cards I colored with "Copic" markers, and the bottom with "Prisma Premier" pencils and OMS. The bottom card is and "easel" card and the tutorial for this card can be found on "Splitcoast Stampers", along with other tutorials for card designs. Tildas make a great accompaniment for my "penny-flowers".


Monday, October 5, 2009

Camp Camby Retreat cards

This 5 x 7 card is my first Christmas card of the pre-season and my first at making a paper pointsetia. Papers used were DCWV-white, red dotted,Stampin Up, red & green JoAnn's. Ribbon Stampin Up. Scalloped oval is an svg file. For this card I used DCWV peach paper for the outter fan and dotted velum for the inner fan. The roses and leaves were also made out of velum. The card was embelished with lace and glittered peel offs .


This card is done with cream paper by DCWV, as are the swirls bird and flowers. The chrsyanthemums are made from a free svg file from svg.com. the bird and swirl are also from svg files cut with my Cricut. The green ric rack is a rub on I got a few years ago, don't recall the company.


This last card uses paper from Stampin Up. The basket of pointsettias was cut from a set I downloaded from one of the many free designs from one of the many photobucket sites. Each layer is cut out and placed on top of the previous layer with "pop dots." I am very thankful to all the wonderful people who share these great designs.


Thursday, September 24, 2009

Waterfall Card


A waterfall card offers a wide variety of designs. This one has a country cottage style. A waterfall card is fairly easy to make. You will need 4 2" X 2" squares to mat your image, 4 squares, 1 7/8" X 17/8" for the image. A strip 3/4" X 4" and a strip 2"X 9". Score the 2 x9 inch strip, starting at the bottom, at 2", 2 3/4", 3 1/2' and 4 1/4". To assemble the waterfall, mount 1 7/8 square on 2" square. Attach one square at the bottom of the strip at the score line, sontine to attach each square at the score lines. I attached the 3/4" X 4" strip with flowere shaped brads. Slide the 9" strip unter the 4" strip and adhere bottom of 9" strip to cross strip. I attached a strip of ribbon as a "pull" for the waterfall.

Thursday, August 20, 2009

Artist Trading Cards


Artist trading Cards (ATCs) are 2.5" by 3.5" works of art. I made these cards for a swap in the Penny Flowers group that I belong to. As you can see the elements of the card are similar, but the elements are also different. The same stamp was used for each card, but each image was colored differently using Stampin' Up Watercolor Pencils. For the flowers, I used card stock for the pink, blue and yellow. The purple flowers are made with vellum. I used a Martha Stewart 4 petal punch for the flowers. I then used my scalloped Nestabillaties rectangle and ovals and Labels 4 to mount at images.

Tuesday, August 18, 2009

Birthday Card for My Aunt


I made this card for my Aunt Anna Roses's 84th birthday. I choose to adorn the card with the"Ultimate Rose" because she is my favorite rose. Growing up, if I wasn't at my own home I was either at her house or my Aunt Libby's house. She and Aunt Libby are very, very special to me.

I made the card using my "Bookatrix" embossing board and embesllished with silver chain boarder peel off stickers. The card was then placed in a Keepsake box (handmade) then packaged in a special cardboard box for mailing. Didn't want to crush those pretty roses. Aunt Anna Rose got the love out of the card that I had for hoped for. I don't get back to my hometown in Pennsylvania as often as I like and was happy to send her my love via this card.

Monday, August 17, 2009

These Blue Flowers are from the "Penny Flowers" book by Angie Evans. I used card stock by DCWV from their Spring collection. The 3 layers of the card were embossed, then cut using the "Bookatrix" from Crafter's Companions. The Bookatrix embossing board was created by 2 ladies from the UK who call themselves "The Glitter Girls". The card was then embellished with pearlized and silver boarder peel off stickers and silver a "Happy Birthday" sticker.


Sunday, March 2, 2008

Fabulous technique


These cards use a combination of 2 techniques from the "Techniques Junkies" Feb/Mar 2008 Newsletter. The techniques are aged metal and penciled twinks. They were easy to do, but create such fabulous results.
For the aged metal background, I first embossed the metalic looking paper with my "CuttleBug". Next I slid black STAZON ink
over the embossing.

The image was outlined in watercolor pencil, then filled in with twinkling H2O's. After I did the fill in, I brought the wet Aqua brush across the penciled areas, dragging the color into the image. And ta da! A great looking card. Stamped image by "Stampin Up".

Tuesday, September 4, 2007

Bellas and Vino Italiano cards


See how different the same stamp can look. You can't see on the cards here, but I used PLAID' "Papier" glass finish paint on the wine glasses. It gives it a realistic look to the glass. Inside the card I printed on my computer sayings in Italian such as "Alla Salute"(cheers), "La Doce Vita"(the sweet life) and "Felice Compleanno"(Happy Birthday). The image was colored using Prismacolr pencils.


Here are my latest 2 Bellas, my chefabellas. Blue chefabella is mounted right on the recipe card on the card stock and the the other was mounted using pop dots. I liked the touch the recipe cards give to the chefabellas.